|
by Ashley Fagan  There is something about a cozy bowl of soup that warms your soul on those cool nights as the season changes from Winter to Spring. If I’m being totally honest, I could eat soup during every season. It may be my favorite things to eat. Comforting, nostalgic, delicious, easy, and usually pretty healthy, if you consider all the veg and nutritious broth you’re adding. This soup is truly something special. I was inspired to make this soup by an idea, if my Grandmother were to make a soup, what would it look like? Veg, rich stock, and definitely meatballs! It would have to be healthy yet hearty, and evoke a sense of comfort. It would taste like coming home. The first time I made this, my husband James proclaimed it to be his new favorite meal, and that’s saying something as he’s been my tried-and-true recipe tester for the last 17 years! He has requested this soup weekly throughout the cold winter months, but I decided to post it now as cabbage is very popular in March due to the St. Patrick’s Day holiday. There is also an abundance of Spring produce now available at the market. Whether you’re still living in the brisk days of Winter, transitioning into the cool days of Spring or just looking for a comforting meal, this soup will surely bring you all the cozy vibes! For the Pork Meatballs
For the Cabbage Soup
For the Meatballs Preheat your oven to 375 degrees and line a rimmed baking sheet with a piece of parchment paper. Use a large bowl and place the slices of white bread in the bottom then pour over the milk. Let it sit for a few minutes while you prep the other ingredients. Add the grated parmesan cheese, parsley, egg, salt and pepper and stir together. Add the ground pork and mix with your hands until well combined but, be careful not to overmix as this will make your meatballs tough. Using a cookie scoop or a tablespoon, measure your pork mixture to form uniform portions into round meatballs. I scoop the mixture into my hands, give it a slight roll, and place it directly onto the parchment lined baking sheet. Continue this process until you have used all the pork. Bake for 25 minutes then set aside. For the Soup While the meatballs are baking, heat a large Dutch oven or soup pot over medium heat. Add the olive oil and heat until shimmering then add the onion and Sautee for 5 minutes until it becomes translucent. Next, add the cabbage, salt and pepper. It will seem that your pot it completely full but the cabbage with reduce quite a bit as it cooks and releases its water. Continue to stir and cook until the cabbage has reduced by half its original volume, about 10-15 minutes. Add the garlic and rosemary and continue to stir occasionally for 3-5 minutes. Reduce the heat to low and place the lid on the pot. Let the cabbage continue to cook for another 30 minutes or until it becomes very tender. Once the cabbage has cooked down and has become soft and sweet, stir in the vinegar. Taste and adjust for seasoning. You may find you want more vinegar, salt or pepper. Add the chicken stock and bring the soup back to a simmer. Stir in the rice and add your parmesan rind. Place the lid back on the pot, reduce the heat to low and simmer gently for 15 minutes. After 15 minutes, gently place the meatballs into the pot and continue to simmer with the lid off for another 15 minutes. The soup can be served immediately, or you can let it cool completely and store in the fridge for up to 5 days. It gets better each day it sits. Reheat before serving and add additional grated parmesan if you like. Enjoy!
0 Comments
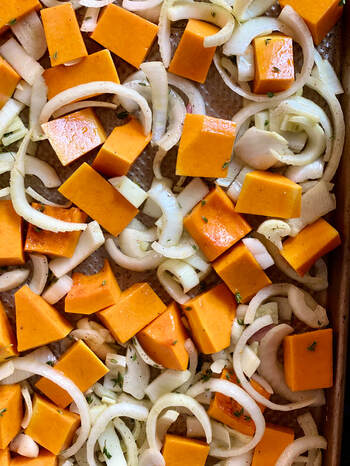
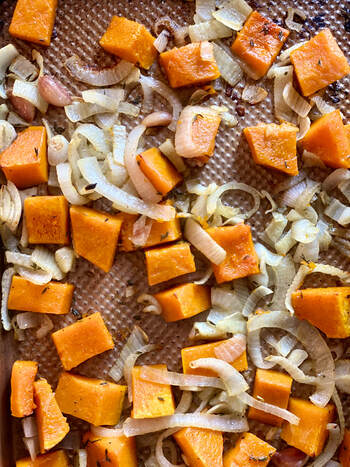
 Would it even be Fall if I didn’t give you a new soup recipe? Of course, it would, but I felt you needed another delicious and creamy soup to keep in your back pocket for when you’re feeling extra seasonal. I don’t like to toot my own horn but “TOOT -TOOT”! This recipe is SO GOOD! I’m not going to lie, it’s going to cost you a bit of clean up, but I promise the results are worth it! Velvety soup, warm and earthy aromas, and a crunchy, sweet topping…ummm, YES, PLEASE! A company worthy dish, sure to impress even your toughest critics! Your guests will love this one so much that they’ll feel obligated to clean the mess up afterwards. I promise not to tell them just how easy it was to make, that can be our little secret! Serves 4 *If doubling the recipe, use 2 baking trays to prevent over crowding of the roasted vegetables. For the Soup
For the Brittle
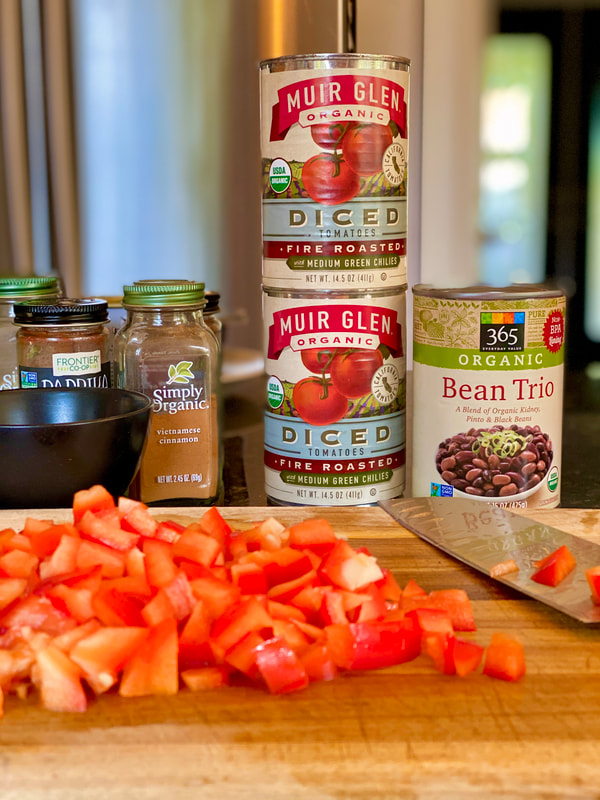
Preheat your oven to 400 degrees. In a large bowl, add the butternut squash, onion, fennel, garlic, thyme, olive oil, salt and pepper and toss until the vegetables are nicely coated. Evenly spread the mixture onto a rimmed baking sheet. Roast in the oven for 15 minutes, remove and toss to make sure everything is cooking evenly. Place the tray back into the oven and roast for another 15 minutes. Remove the baking tray from the oven, pick out the three garlic cloves and set them aside. Carefully scrape the rest of the vegetable mixture into a large Dutch oven set over medium heat. Add the sherry, bay leaf and squeeze the roasted garlic cloves into the pot, discarding the skin. Let the mixture simmer for 3-5 minutes until the sherry cooks down a bit, then add the chicken stock. Continue to simmer for another 10 -15 minutes. While the soup is simmering, make the brittle. In a small pan over medium low heat, add the pistachios, butter and cinnamon. Shimmy the pan around until the mixture becomes fragrant, this should only take a few minutes. Pour in the maple syrup and keep shimmying the pan as it bubbles for 1 minute. Sprinkle in a pinch of salt and a grind of pepper and give it one more shimmy. Pour the brittle onto a plate or small tray and use a rubber spatula to evenly spread out the mixture. Set aside to cool. Remove the bay leaf from the pot and discard. (DON'T FORGET THIS STEP!! THE BAY LEAF WILL RUIN YOUR SOUP IF IT ENDS UP IN THE BLENDER!!) Carefully ladle the hot soup mixture into a blender...did you take out the bay leaf...do it now! Puree the soup until smooth (leave the vent of the blender off to allow steam to escape but place a clean dish towel over the opening to prevent splatter). Pour the soup back into the pot, you can turn the heat off at this point or set it to the lowest setting to keep warm. Stir in the Crème Fraiche, reserving a few tablespoons for serving. Once the Brittle has cooled and hardened, break it apart with your hands. Ladle the soup into bowls and swirl in a spoonful of the reserved Crème Fraiche and a sprinkle of the pistachio brittle, serve immediately and enjoy! 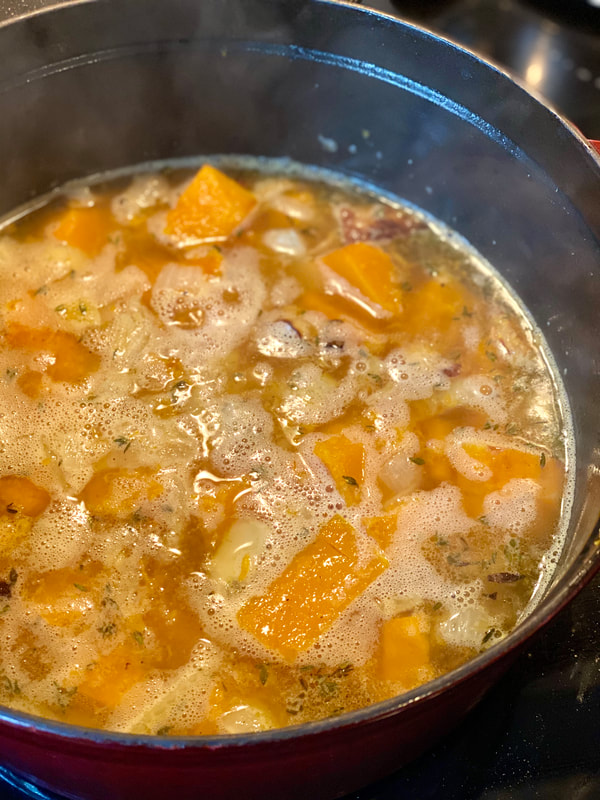 by Ashley Fagan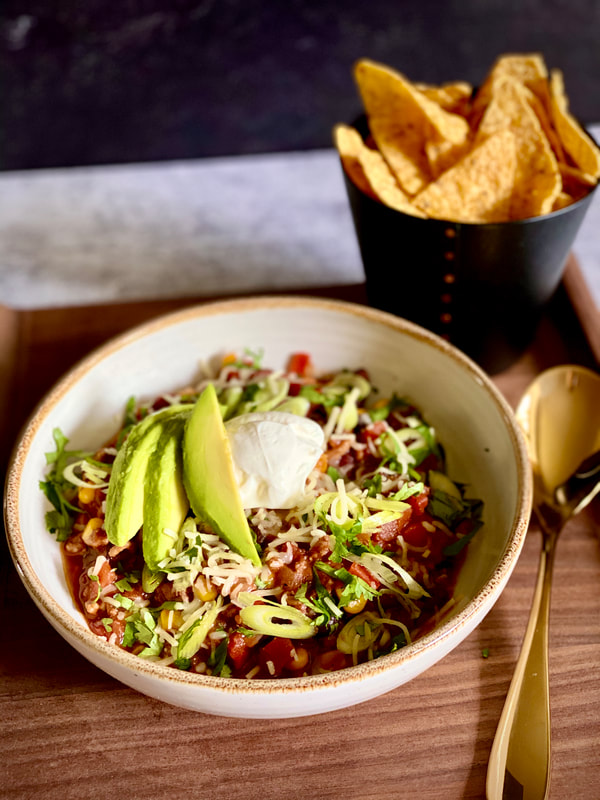 Once the weather turns from humid Summer days to crisp Fall nights, my mind immediately shifts to all things cozy and comforting. I’m not ashamed to admit that I love all things “basic” when it comes to the Autumn season. Cozy sweaters, warm boots, chunky scarves and of course, anything pumpkin spiced! The Fall vibes don’t stop at my attire, but they consume my cooking habits as well. You can find me whipping up all sorts of soul satisfying comfort food including soups, stews, spiced cakes and of course, CHILI! I love creating different variations of chili throughout Fall and Winter but this easy, weeknight friendly version is one I turn to repeatedly. It’s smoky, sweet, and slightly spicy flavor is, in my opinion, the perfect Chili trifecta! I use ground turkey here instead of a traditional ground beef, but you can certainly improvise by using your favorite ground meat. Ground chicken or pork would also be a welcome addition! When shopping for your ingredients, look for fire-roasted diced tomatoes that include green chilies. They are available in most supermarkets, but if you can’t find them, you can use regular diced tomatoes and add a small can of mild green diced chilies instead, which can be found in the same aisle as the taco ingredients. I also like using a can of mixed chili beans here so that you get a nice texture and flavor balance. Chili beans typically include a mix of black beans, pinto beans and kidney beans but if you can’t find a can of the mixed variety, you can choose your favorite to add instead. Be careful not to accidentally buy canned chili! You want canned chili beans. Big difference! Canned chili beans do not include additional ingredients. Have fun with this recipe! It’s very forgiving and incredibly versatile! You can also easily double the recipe to feed a crowd or use it to top a big plate of nachos, which is something we do often on Friday’s for our Family Movie Dinner Night! I would love to hear how this recipe turned out for you! Drop me a comment below to let me know how you adapted the recipe.
Heat a large Dutch oven over medium heat and add the olive oil. Add the diced onion and sauté for 5 minutes until they begin to appear translucent. Add the diced bell pepper and a pinch of salt and continue to sauté for another 5 minutes until they begin to brown slightly. Add the garlic and stir for another minute or until it becomes fragrant Add the ground turkey and spice blend, breaking up the turkey meat and stirring to combine. Cook for another 5 minutes until the turkey is mostly cooked through. Add the canned tomatoes, chili beans, BBQ sauce and honey, stir to combine and bring to a simmer. Once simmering, reduce the heat to low, cover with a lid and cook for 25 -30 minutes, stirring occasionally. While the chili is cooking, prepare your toppings. After the 30 minutes, stir in the corn and let sit for another 5 minutes on the lowest heat setting. Serve in big heaping bowls with the toppings laid out so everyone can add what they want! Don’t forget a big pile of tortilla chips or a hunk of corn bread! 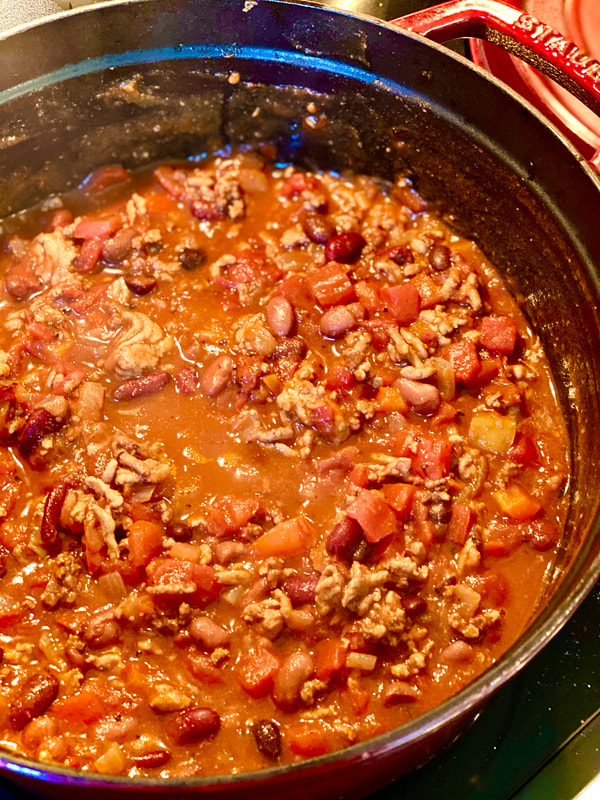 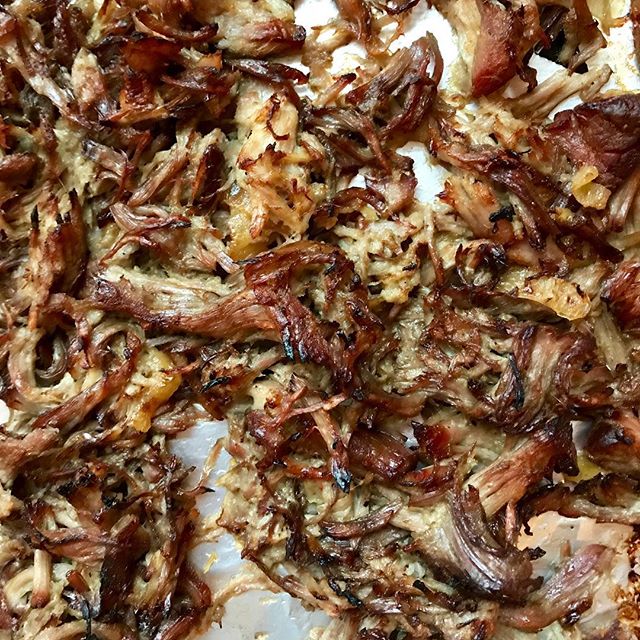 So I have a little secret to share.....sometimes I just don't feel like cooking! I know, I know, this is probably completely contradictory to my enthusiasm for encouraging everyone I come into contact with to cook as often as possible, but lets face it, life can be a little overwhelming some days and we all need a fail safe approach to putting a comforting meal on the table for our starving families after a long hard day. This one is hard to pass up with its minimal prep, and set it and forget approach! And lets be honest, who doesn't like tacos! Can I get a "Yum!" ya'll! Serves 6 4-5 lb Bone in Pork Butt, trimmed of excess fat 1 Onion, sliced thin 3 cloves garlic, peeled and whole ½ Orange 1/4 Cup Brown Sugar 1 Cinnamon Stick 1 Bay Leaf ½ Can/bottle of beer, preferably a flavorful beer such as a Pinapple or Mango Salt and Pepper For Serving - corn tortillas, sour cream, sliced radishes, shredded cabbage, lime wedges and cilantro. Place the pork butt in the slow cooker and season generously with salt and pepper, (about 2 tsp salt and 1 tsp pepper). Place the onion slices, brown sugar, orange half, garlic cloves, cinnamon stick, and bay leaf around the pork and pour in half a can of beer. Set to high and cook for 6-8 hours. The pork should be very tender and falling away from the bone. Pre-heat your broiler. Once the pork is cooked, discard the cinnamon stick, orange half, bay leaf and garlic cloves. Remove the pork butt and place it on a rimmed baking sheet. Shred the pork and discard any hunks of fat and gristle along with the bone. Spread the pork evenly on the baking sheet and place under the broiler for a few minutes until it starts to crisp up. Stir it around and set it back under the broiler. Do this a few more times, checking the pork after a few minutes each time, careful not to char the pork pieces. Once you receive your desired crispness, place the shredded pork back into the slow cooker with the juices. Serve with corn tortillas, sour cream, radishes, shredded cabbage, lime wedges and cilantro.  Where has this dish been all my life?! Why did it take me so long to create such a simple and elegant supper that I can throw together for my family in 30 minutes and feel confident enough to serve for a last-minute dinner party? This one takes the cake when it comes to versatility and sophistication! I love how the salmon melts into the pasta and the saffron cream coats every noodle so that every bite is a burst of flavors that leaves you wanting, well, a bigger fork! My husband walked in the door after work and looked at me and said "My God! What is that amazing smell!?" he took one bite and melted into his chair! I’ll take that as one of the best compliments I could ever receive! *This dish uses 3/4 of a bag of dried pasta which can be bit annoying, I know, but I like to use the leftover past for soup. I always have handfuls of different pasta shapes in wrapped up bags lying around my pantry for when I feel the desire to whip together some homemade soup. Serves 4 hearty bowls or 6 smaller portions
Bring a large pot of heavily salted water to a boil and cook the pasta according to package directions to al dente. While the pasta is cooking, season the salmon with a ½ tsp of the salt and some fresh ground pepper and set aside. In a large skillet (large enough to add the pasta at the end) melt the butter over medium heat until it starts to brown a bit and smell toasty and nutty. Be careful not to burn the butter, it happens quickly. Add the leeks and the other ½ tsp salt and pepper to taste. Sautee until the leeks start to melt into the butter and brown slightly, about 3-5 minutes. Add the vermouth and the saffron and simmer until the vermouth is reduced by half, about 3 minutes. Add the chicken stock and the cream and bring to a simmer. While you are waiting for the sauce to simmer, cube the salmon fillet into 2-inch large chunks. Add the Salmon cubes to the simmering sauce, cover and cook over medium low heat for 2-3 minutes. Uncover and turn the salmon cubes. Layer the spinach on top of the salmon and cover for another 3 minutes, or until the spinach has wilted a bit. Uncover and stir everything together. Add the pasta and stir, breaking up the salmon a bit as you go. Be gentle, you don’t want to break apart the salmon pieces too much. Cook for a few minutes longer, allowing the flavors to mingle. If the pasta starts to appear dry, add some of the reserved pasta water to loosen it up. Top with the chopped chives and serve.  Philly is most commonly known for its cheese steaks and roast pork, but this sandwich takes the two and combines them into a happy marriage of delicious sandwich goodness! Leave it cook in the slow cooker all day and come home to the most amazing smell and dinner on the table with very little effort! This is a winner in everyone’s book because, let’s be honest, who doesn’t like a sandwich?! Serves 6 Shredded Beef with Onions
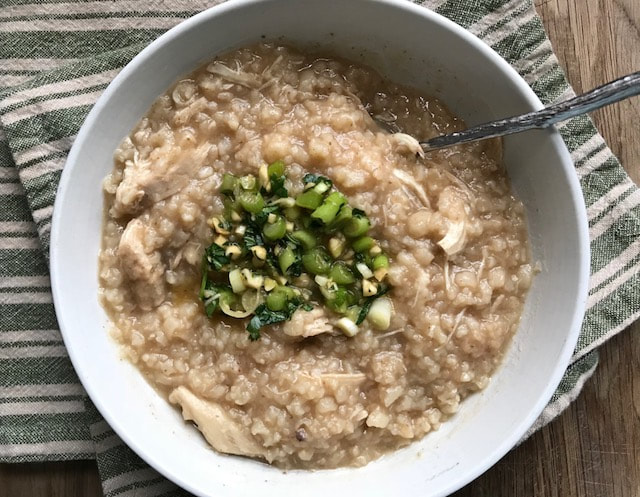 Congee is most commonly known as an Asian rice porridge. Rice is cooked in a lot of liquid until it breaks down and turns velvety and thick. It’s the ultimate comfort food when you feel a cold coming on or if you want something to warm you up on a cold winter night. The addition of chicken turns it into a heartier meal and the scallion gremolata adds a little zing to brighten the Asian inspired flavors. Serves 6 Chicken Congee
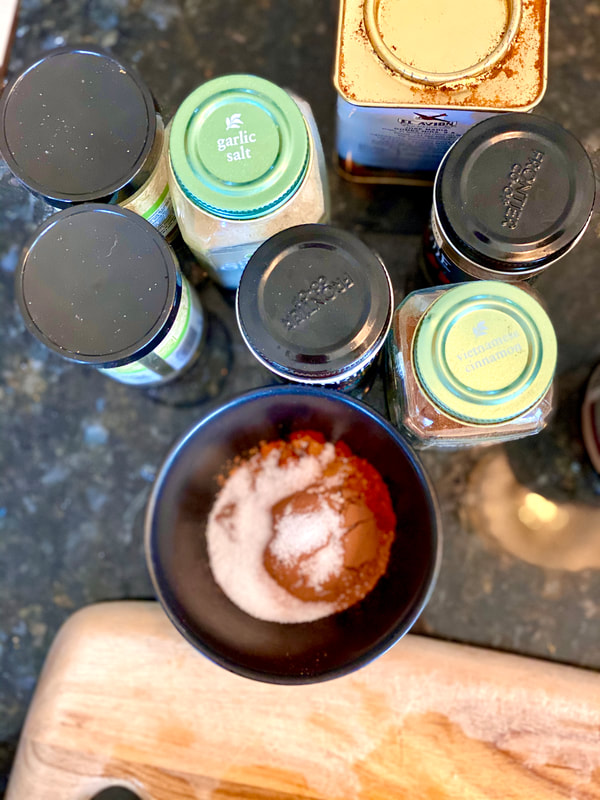
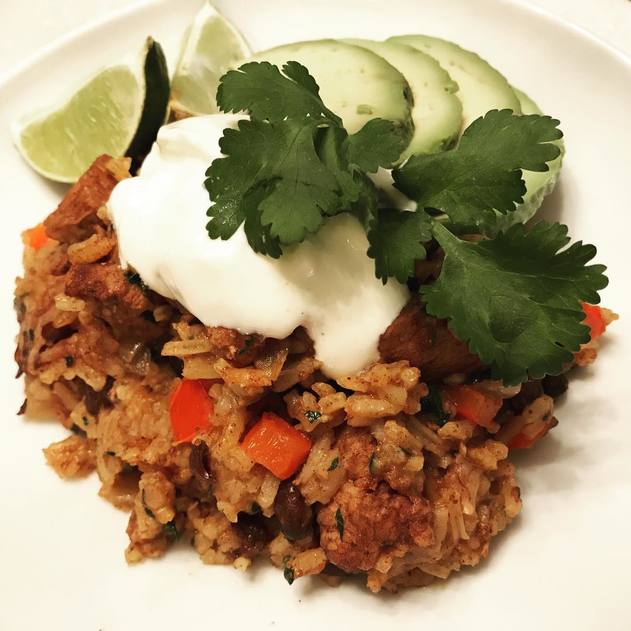 I will be the first to admit that homemade Mexican food has always been a bit intimidating for me. Not because I didn't feel up for a challenge but more so for the fact that I just don’t have the time to immerse myself in a day long cooking extravaganza just to put a plate of food on the table! Most Mexican style recipes I’ve come across are accompanied by a large list of hard to find ingredients and recipes for sauces and add ins that are required to make the original recipe! I’d find myself halfway through reading the directions before I closed the book and focused my attention on a task less daunting. I created this recipe in hopes of limiting the amount of Mexican take out my family was ordering while still being able to create something delicious and satisfying for my family to enjoy on a weeknight. I will admit that this recipe comes with a long list of ingredients, most of which you probably already have on hand, and quite a few steps but if you follow the order they are written, you can have this ready to serve in about 40 minutes. Not too shabby for a hearty weeknight dinner! Serves 4 For the Chicken 1 lb. Skinless Boneless Chicken Breasts, cut into 1 inch cubes 1 T. Olive Oil or Canola Oil 2 tsp. Cocoa Powder 1 tsp. Cumin 1 tsp. Coriander 1 tsp. Dried Oregano 1 tsp. Garlic Salt 1/2 tsp. Chipotle Chili Powder (1 tsp if you like a bit more spice) 1/2 tsp. Salt 1/4 tsp. Cinnamon For the Rice 1 Cup Basmati Rice, rinsed and drained 1 1/2 Cups Chicken Broth 1 T Tomato Pasta 1 T Butter 1/2 tsp Salt Additional Ingredients 1 Red Bell Pepper, medium dice 1 Onion, medium dice 2 Garlic Cloves, minced 1/2 cup Chicken Broth 1 Can Black Beans, rinsed and drained 1/4 Cup Chopped Fresh Cilantro 3 T Olive Oil or Canola Oil, separated Cilantro, Avocado, Lime and Sour Cream (for Serving) In a small bowl combine the cocoa powder through cinnamon to create the spice mixture. Add the chopped chicken, olive oil and spice mixture to a medium size bowl and toss well until the chicken is completely coated. Set aside on the counter and start the rice. For the rice, add the rice, chicken broth, tomato paste, butter and salt to a medium size sauce pan. Bring the rice to a boil and then cover with a tight-fitting lid and reduce to a simmer. Simmer on low heat for 20 minutes. Remove from the heat after 20 minutes (if using an electric burner, move the pot to a cool spot on your stove top) and let sit in the pot for an additional 10 minutes without lifting the lid. After 10 minutes, fluff the rice with a fork. While the rice cooks, heat a large Dutch oven over medium heat with 2 T olive oil. Once the oil is hot and shimmering add the chopped onion. Sauté for about 3 minutes until the onions begins to appear translucent then add the bell pepper. Continue to sauté for another 5 minutes until the vegetable start to take on a bit of color and become soft. Be careful not to let them get too dark, stir them frequently as they cook (hence the word sauté!) Next, add the minced garlic and continue to stir until the garlic becomes fragrant, about 1-2 minutes. Transfer the onion and pepper mixture to a separate bowl and add the remaining 1 T of olive oil to the Dutch oven. Once the oil is hot, add the spiced chicken in an even layer to the bottom of the Dutch oven and let in sit for a few minutes before stirring. This allows the chicken to develop a bit of a crust. After a few minutes stir the chicken to allow the other side to crisp up a bit. Once the chicken is fully cooked, about 5 minutes in total, return the onion mixture to the Dutch oven. Add the chicken broth to the pan and bring to a boil, scraping the bottom of the pan to get up those tasty little charred bits. Add the black beans and simmer the whole mixture on medium low heat for about 3 minutes, until the chicken broth has reduced by half. Remove from the heat and stir in the cooked rice and chopped cilantro. Fill a few bowls with heaping spoonfuls of the rice mixture and top with a big squeeze of fresh lime juice (try not to skip the lime as it brightens the dish and adds a ton of flavor), additional fresh cilantro, avocado and sour cream! Delish! 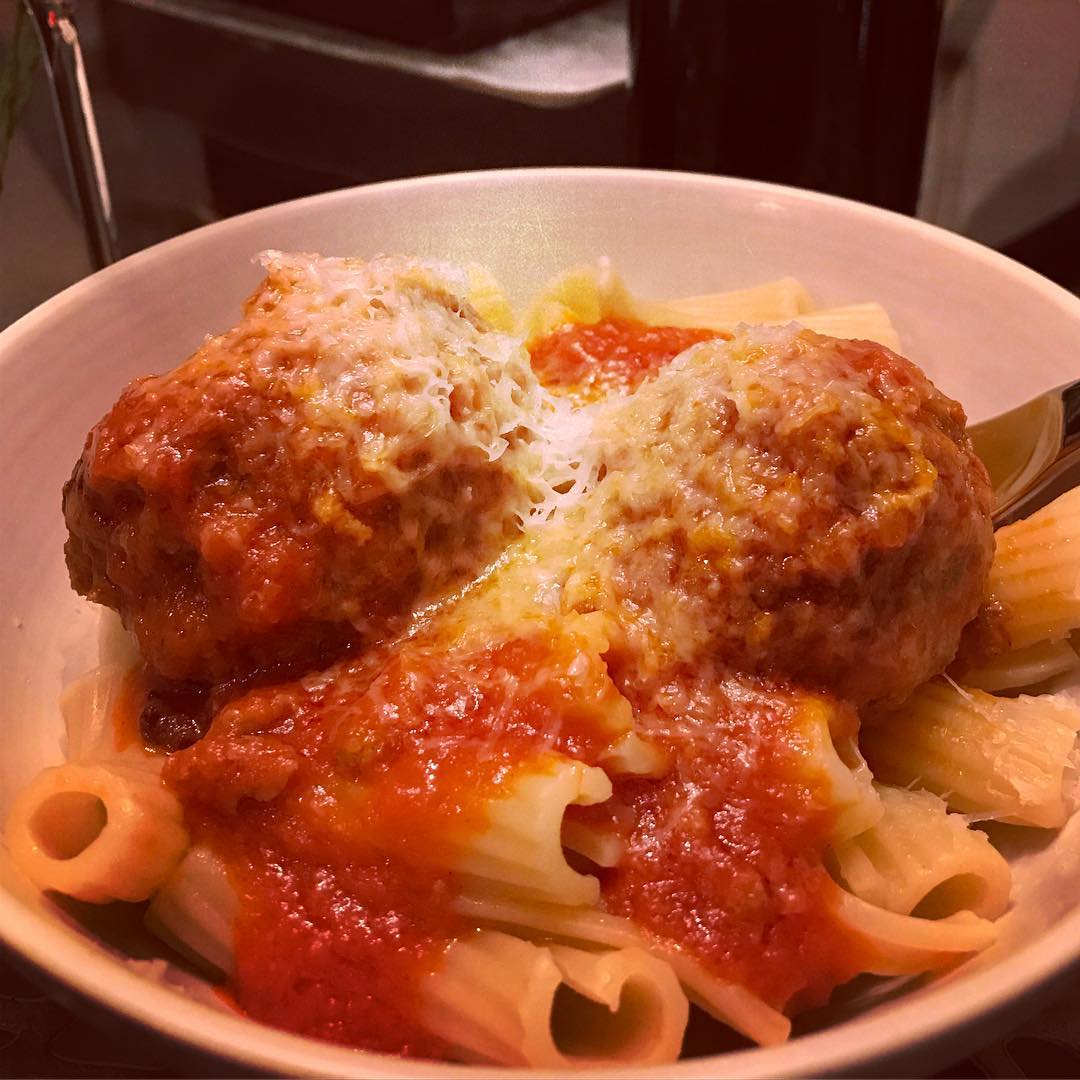 Pasta is my ultimate comfort food. There is just something about a big bowl of noodles covered in a thick, rich sauce that warms me to my core. On weekends, I will sometimes spend all day laboring over a big pot of Bolognese or "Sunday" sauce but I don't have as much free time these days so I decided to create a version that was easy to pull together but didn't lack that slow cooked flavor. My original inspiration for this recipe came from a tomato sauce recipe I discovered in Food52's Genius Recipes by Kristen Miglore. It's a simple sauce of tomatoes, butter and onions that takes literally almost zero effort to whip together and delivers a delicious result that can be used on just about anything. I tweaked their version a bit and added meatballs to the simmering sauce to create a version that can be made on a week night when you have a little extra time. I hope you enjoy! Serves 4 Easy Tomato Sauce 1 28 Ounce Can of Whole San Marzano Tomatoes 5 T Butter 1 Medium Onion, Sliced 1 T Honey ½ tsp Salt ¼ tsp Ground Cinnamon Meatballs 1/2 lb. Lean Ground Beef 1/2 lb. ground pork 1 Large Egg 1/3 Cup Whole Milk 1 Cup fresh ground day old white bread crumbs (I give mine a spin in my food processor) ½ Cup Parmigiano Cheese, ground (I grate my cheese in the food processor until it looks like coarse sand) 1 T Chopped Fresh Parsley 1 Large Garlic Clove minced fine 1/8 tsp Fresh Grated Nutmeg ½ tsp Salt Fresh Ground Pepper to taste 2 T Olive Oil Rigatoni, cooked to package directions. Grated Parmigiano or Pecorino Cheese for serving. In a Dutch oven, add the tomatoes, butter, onion, cinnamon, salt and honey. Heat until the sauce begins to simmer and the butter has melted. Cover and continue to simmer over low heat for 30 minutes, stirring occasionally. You can prepare the meatballs while the sauce cooks. After 30 minutes, the onions should be tender. Add the sauce to a food processor or blender and process until smooth. Return the sauce to the pot and continue to simmer. Add the ground meat to a medium size mixing bowl. Whisk together the milk and eggs and add to the beef. Add the bread crumbs, cheese, parsley, garlic, nutmeg, salt and pepper. Using your hands, mix the ingredients together until they are well combined but be careful to not over mix or your meatballs will be tough. Gently press the meat mixture into the bowl and make a cross using your hands into the top of the meat to divide it into 4 equal portions. Take each quarter of meat and roll it into two equal size meatballs. Continue with the rest of the mixture until you have 8 meatballs in total. Heat the oil in a large nonstick skillet over medium heat. Once the oil is hot, fry the meatballs for 3-4 minutes until a crispy, brown crust forms. Flip the meatballs and repeat on the other side. Remove the meatballs from the oil and drain on a plate lined with a paper towel for a minute. Add the meatballs to the sauce, cover and cook for an additional 15-20 minutes at a simmer until the meatballs are cooked through. I usually cook my pasta while I wait for the meatballs to finish cooking. Spoon the pasta into shallow bowls and top with two meatballs and a ladle full of sauce. Grate fresh Pecorino or Parmigiana over the top and enjoy! 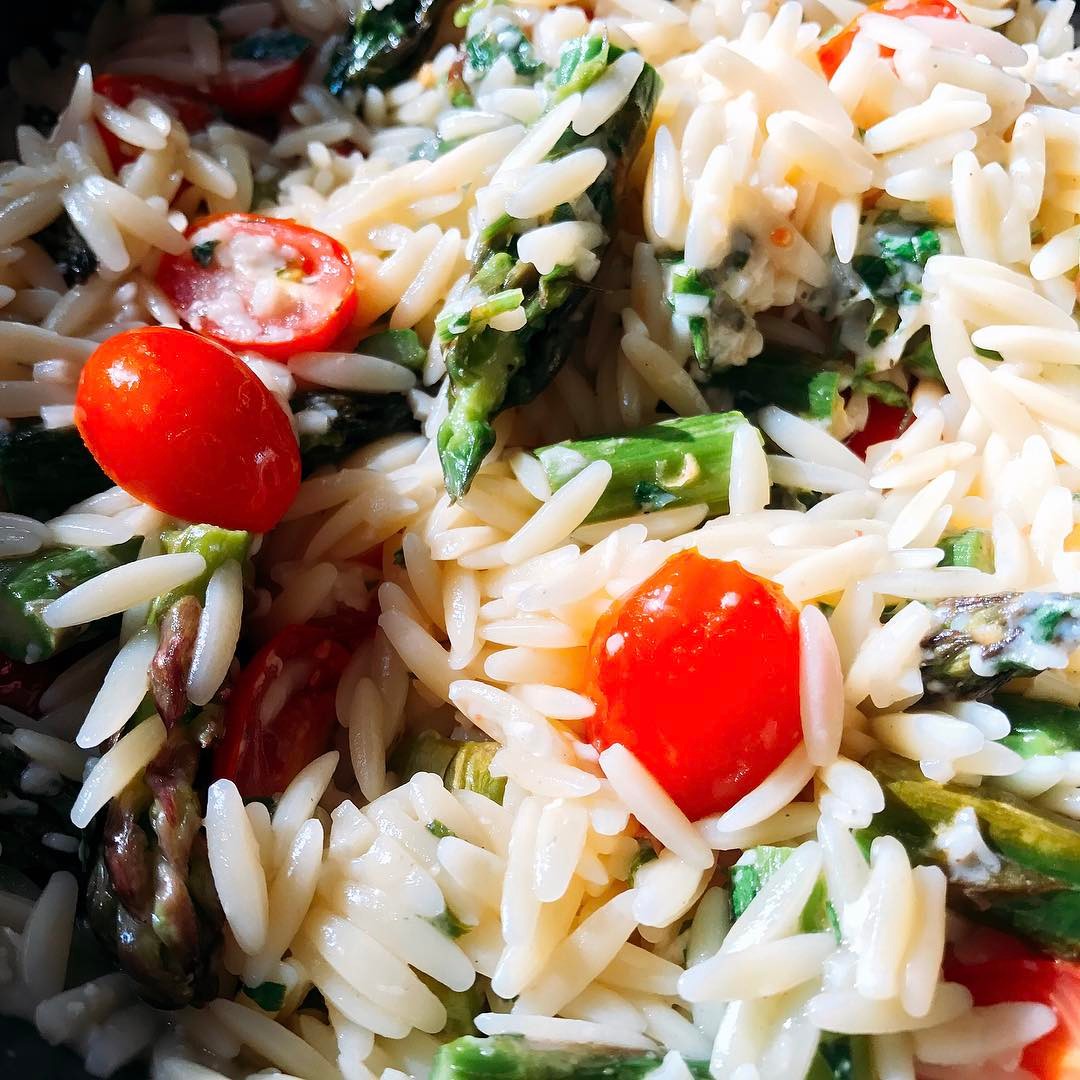 I'll admit that on some week nights, I am just too exhausted by the thought of making dinner, but the idea of ordering takeout, picking it up and overpaying for something that is just so-so is equally exhausting. I have been on a mission to create easy meals that can be prepared with little hassle and minimal cleanup for nights such as these. This lemon veggie orzo is satisfying, somewhat healthy (at least healthier then takeout) and a snap to throw together. If you feel so inclined, grill up some fish or chicken to serve along with the pasta but this dish can easily hold its own. It can also be served at room temp or eaten directly from the fridge the next day if you have any leftovers. Serves 4 1 lb Orzo cooked to package directions 1 Bunch of Asparagus, trimmed of woody ends and cut into 1 inch pieces 2 T olive oil 1 Lemon, zest and juice 1 tsp Garlic Salt Pepper to taste 1 Pint Grape Tomatoes, halved 2 T fresh minced parsley 1 T olive oil Salt and pepper to taste 2 T butter 1 Cup Freshly Grated Parmesan Preheat your oven to 400 degrees and start the water for the Orzo. On a baking sheet toss the asparagus pieces with 2 T olive oil, lemon zest, garlic salt and fresh ground pepper. Spread the pieces out evenly and roast in the oven for 15 minutes. Start the orzo the same time you add the asparagus to the oven. While the asparagus and orzo cook, grab a large mixing bowl or serving bowl. Add the halved tomatoes, 1 T olive oil, juice from 1 lemon, parsley and a generous pinch of salt and fresh ground pepper to taste. Stir together and allow the tomatoes to macerate while to asparagus and orzo cook. Remove the asparagus from the oven once it is slightly charred but still hold a slight bite. Drain the orzo and add both the asparagus and pasta to the bowl with the tomatoes. Add the butter and stir until everything is combined and the butter has melted. Toss in the cheese and mix until everything is coated. You can serve this dish immediately or at room temp....it’s not fussy |