|
by Ashley Fagan 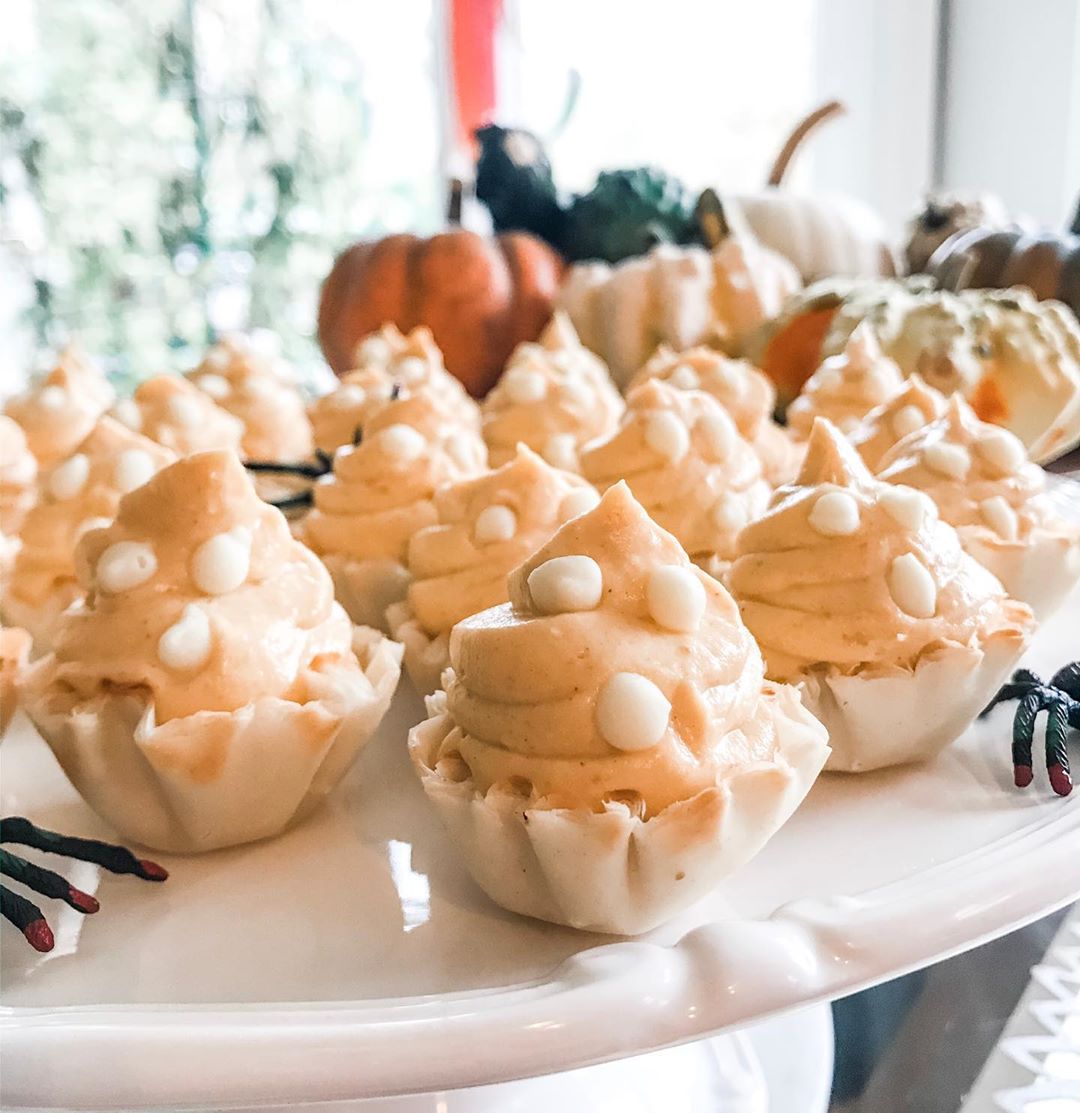 I just love Halloween! Everything about this Holiday just screams FUN! The month of October is an all out Autumn celebration full of Fall walks, Halloween movie nights, hot apple cider, toasty fire side s'mores, and of course lots of delicious Halloween inspired treats! These one bite, no bake pumpkin cheesecakes are the perfect treat to help celebrate the holiday season! They are tasty, super simple and take all of 20 minutes to put together! Happy Halloween! Makes 30 Ghosts Pumpkin Cheesecake Filling 2 – 8 oz. Packages Cream Cheese at Room Temperature 1 cup Pumpkin Puree ¾ cup Sugar 2 tsp. Vanilla Extract 3/4 tsp. Cinnamon 1/4 tsp Ground Ginger Pinch of Ground Cloves Pinch of Salt To Make The Mini Ghosts 2 – 15 Count Packages Store Bought Mini Fillo Shells, Thawed. (in the freezer section) 1 Gallon Size Ziploc Bag Mini Chocolate Chips or White Chocolate Chips In a large mixing bowl combine all ingredients through salt. Using a hand-held electric mixer, mix on medium speed until nice and creamy. Use a rubber spatula to scrap down to the bottom of the bowl to ensure all ingredients are incorporated. Give it one more mix with the electric mixer. Using the rubber spatula, transfer the batter to the large Ziploc bag and zip it closed, ensuring all the air is removed. Cut a small tip off the bottom corner of the bag. Pipe the mixture into the individual fillo shells, be careful not to over stuff them. Once all the shells are filled, decorate the pumpkin ghosts with the mini chocolate chips. Refrigerate until ready to serve and enjoy!
0 Comments
by Ashley Fagan photo credit @kitchencoma via InstagramI am slightly obsessed with granola. Not that store bought, card board textured, unappealingly bland nonsense you buy in the supermarket of course! Granola is so simple to make at home and SO MUCH BETTER then anything you can buy off a shelf! This lovely homemade, protein rich, whole grain, subtly sweet, slightly salty, crunchy little bite sized bits of deliciousness is so good you'll find it hard to find an excuse not to eat it throughout your entire day, hence the name "Anytime Granola". Whether it be post morning workout, afternoon lunch or late night snack, this granola is sure to be a new favorite in your home!
Makes about 6 cups prepared 2 Egg Whites 1/4 Cup Pure Maple Syrup 3 T. Olive Oil 1 Tsp. Vanilla Extract 1 Tsp. Cinnamon 1/2 Tsp. Kosher Salt 1/2 Tsp. Ground Ginger 1/2 Tsp. Turmeric 1 1/2 Cups Rolled Oats 1 Cup Unsweetened Coconut Flakes 1/2 Cup Pecan Pieces 1/2 Cup Slivered Almonds 1/2 Cup Pumpkin Seeds 1/3 Cup Millet 2 T. Sesame Seeds 1/2 Cup Dried Cranberries Preheat the oven to 325 degrees. Line a rimmed baking sheet with parchment paper. In a large mixing bowl, whisk together the egg whites through turmeric until well combined. Add the oats through sesame seeds and stir together with a rubber spatula until everything is nicely coated. Pour the mixture onto the parchment lined baking sheet and spread out in an even layer using a rubber spatula. Place the baking sheet in the center of the oven and set your timer for 15 minutes. Remove the granola from the oven and give it a good toss with the rubber spatula then spread back out into an even layer. Return the baking sheet to the oven for another 15 minutes then remove and toss again. Finish the granola for another 10 minutes then remove from the oven and rest until completely cool. Add the dried cranberries and store in an airtight container for up to 1 week. My favorite way to eat this lovely granola is piled on top of unsweetened Greek yogurt with a handful of fresh blueberries and a drizzle of local honey! Yum! by Stephanie Spickler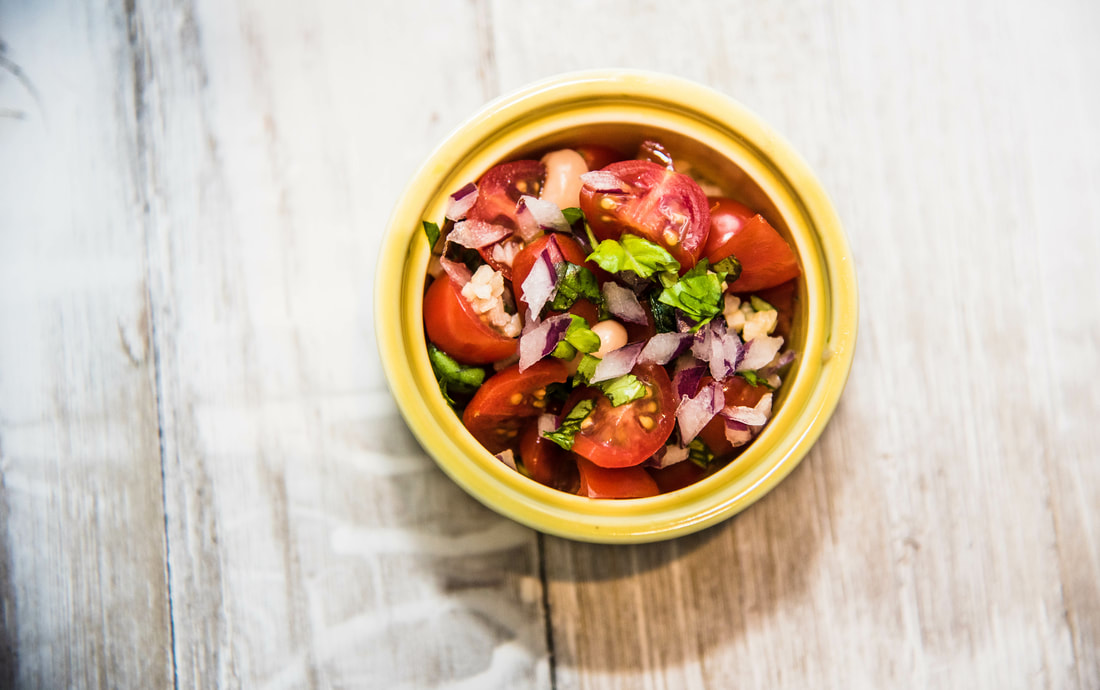 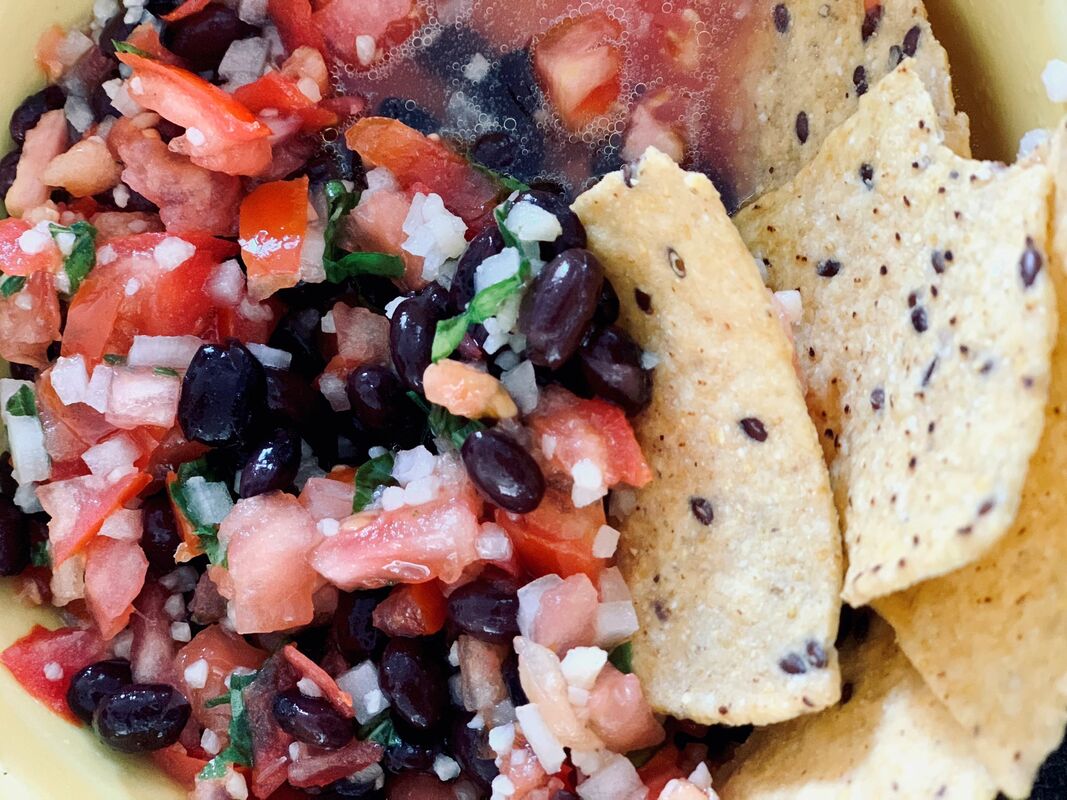 Calling all Salsa lovers…. Calling all Chips & Dip lovers ..
Calling all super-food & snack lovers .. Ever wonder if there’s a way to marry super-foods with your favorite (typically unhealthy) snack foods? Well, good news - there is! If you love salsa, dips & super-foods, this quick fix “dip” list is for you! Traditional mild salsa. For a fresh flavorful, traditional mild salsa. I highly recommend trying this recipe! Tomatoes are a great source of lycopene which has been linked to reducing heart disease and cancer. They are also a great source of vitamin C, potassium, folate and vitamin K to keep you immune system healthy and your skin looking great! You can pick what type of tomato you would like to use as your main ingredient and the rest is easy Prep time is about 5 minutes. You can grab your favorite “salsa” bowl and just add ingredients one by one, stir it up well before serving. Refrigerate any leftovers.
For a spicy version, add chopped jalapeños! I love a good kick so when I spice mine up I use about ½ of the jalapeño - my husband prefers I use way less but you can add to your own taste preference! Eat your “Protein” Salsa This recipe will not disappoint! Not only is it one of the BEST homemade bean recipes, it’s quite delicious and borderline addictive by itself, or as a bean salad or when you pile it on top of blue corn chips as a salsa. This is the most scrumptious, healthy snack, great for busy moms in need of quick, nutritious mom fuel! Serve as a snack - solo or with corn chips. Top your tacos on Taco Tuesday or dress up a salad southwestern style!
Chicks & Dip Chick Peas as a snack dip? Weird combo? Not when you try this amazing, zesty chip dip! As a salsa lover and health junkie, I had to create my now unique salsas & dips because I just don't want to eat that junk from the grocery stores and I need something full of nutrients, not corn syrup and preservatives. I am a busy stay at home mom and when we eat, I need to make sure we eat healthy. So, I’ve perfected the Chicks & Dip ..and bonus, my toddlers love it too! I personally opt for Blue Corn Chips or naan bread to pair with this recipe but you can get creative, try some crackers! Switch it up, get funky. Enjoy it how you like it! As an added bonus, chick peas are a rich source of iron, fiber and protein to help your little ones grow big and strong!
Grab some pita or naan bread & enjoy! Beans & Couscous This delightful and light blend is sure to fill you up & recharge your fuel levels. It’s packed with protein & vitamins and rich in beta carotene to boost your immunity!
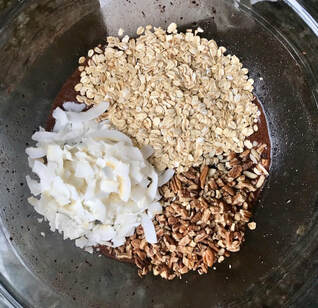
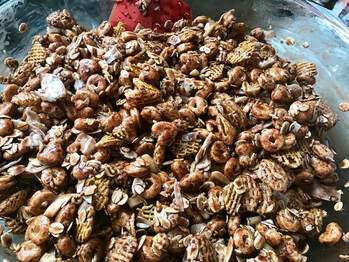
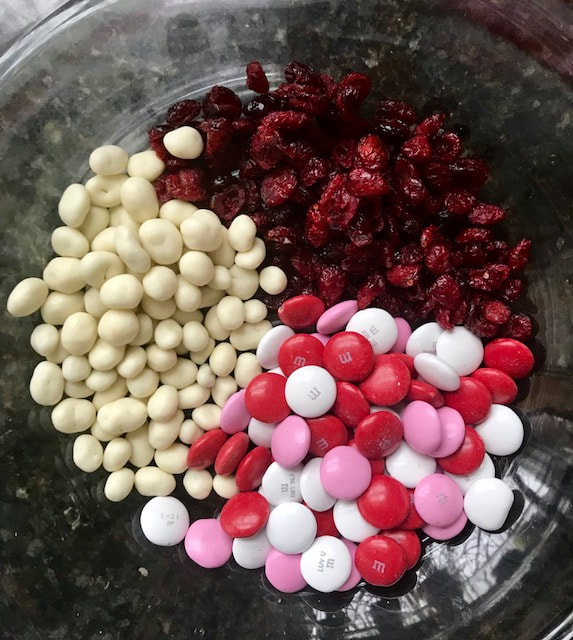
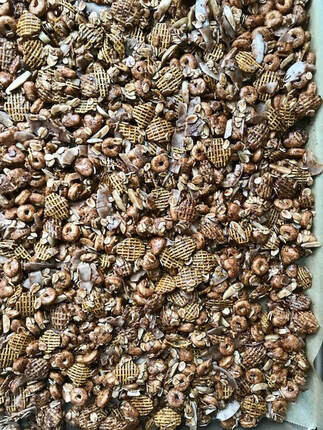
I enjoy eating this by itself and topped with diced cherry tomatoes and drizzled Carter & Cavero Balsamic vinegar. This is a great sandwich topper! Get creative, mix it up and make your own variation of a super-food dip! Feed your body the good stuff! by Ashley Fagan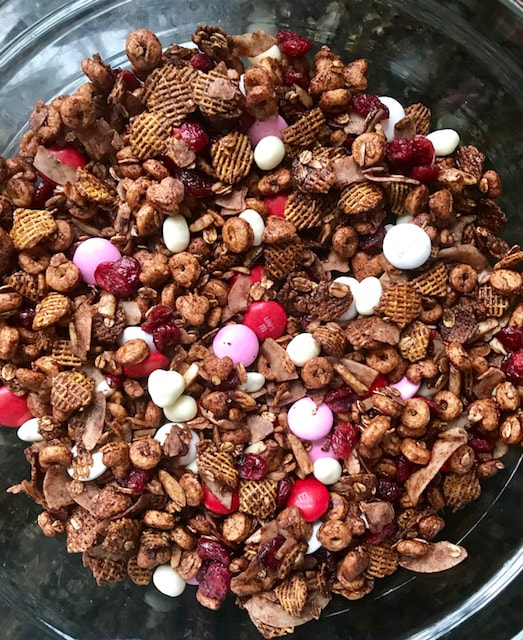 Looking for a healthy alternative for your little one to hand out this Valentine's day? This Love Munch is the perfect chocolaty treat that will satisfy any sweet craving. You wont miss that sticky, sugary candy one bit! Feel free to play around with the ingredients. Maybe some sunflower seeds or chocolate chips would be a nice addition. It's totally up to you! Go crazy!
Makes about 12 Cups
Preheat the over to 300 degrees. Line a rimmed baking sheet with parchment paper and set aside. In a large bowl, whisk together the egg whites through maple syrup. Dump in the almonds, coconut, cereal and oats and gently fold together until the mixture is evenly coated. Pour the mixture onto the parchment lined baking sheet and spread out into an even layer. Bake at 300 degree, stirring every 10 minutes for a total of 30 to 40 minutes or until the cereal is toasted. It still may appear a bit wet, that's OK! It will crisp up as it cools. Allow the mixture to cool completely, at least 30 minutes. Once the mixture is cool, add the craisins, yogurt raisins and M&M's and gently fold together. Store in an airtight container for up to 5 days. by Ashley Fagan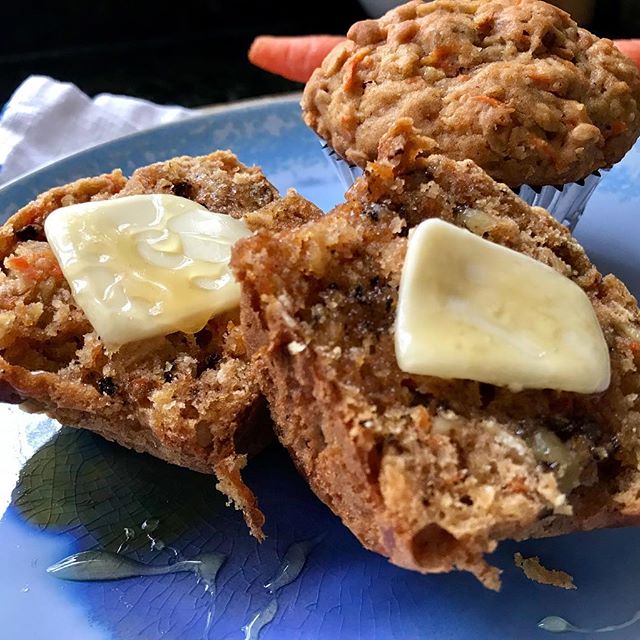 Looking for a change to your morning breakfast routine! Warm spices and subtly sweet delicate crumbs make for the perfect morning pick me up! These muffins are packed full of heart healthy oats, protein rich Greek yogurt and sweet carrots which are an excellent source of beta-carotene, potassium and antioxidants to give you the boost you need to get through the morning rush. Don’t skimp on your morning fuel! Keep a few of these on hand the next time you need a little something more than coffee to get you going. Makes 12 Muffins
Preheat the oven to 350 Degrees. Line a 12-cup muffin pan with liners. In a large bowl, mix together the flour through ground clove and set aside. In a liquid measuring cup whisk together the sugars, yogurt, applesauce, vanilla and egg until combined. Whisk in the melted butter and then add the wet ingredients to the bowl of dry ingredients. Using a rubber spatula, fold together the wet and dry ingredients until combined. The batter will be thick and sticky. Fold in the grated carrot, chopped walnuts and raisins. Evenly divide the batter among the 12 muffin cups, about 1/3 cup batter per muffin. The cups will be full but don't worry. Bake in the center of the oven for 25-30 min, checking after the 25-minute mark by inserting a toothpick into the center muffin. When the toothpick comes out clean and the tops are lightly browned they are done. Cool for 10 minutes in the pan and then transfer to a cooling rack. They are best eaten right after baking but you can also store them in an airtight container for up to 4 days. Serve with butter and honey for an extra special treat! 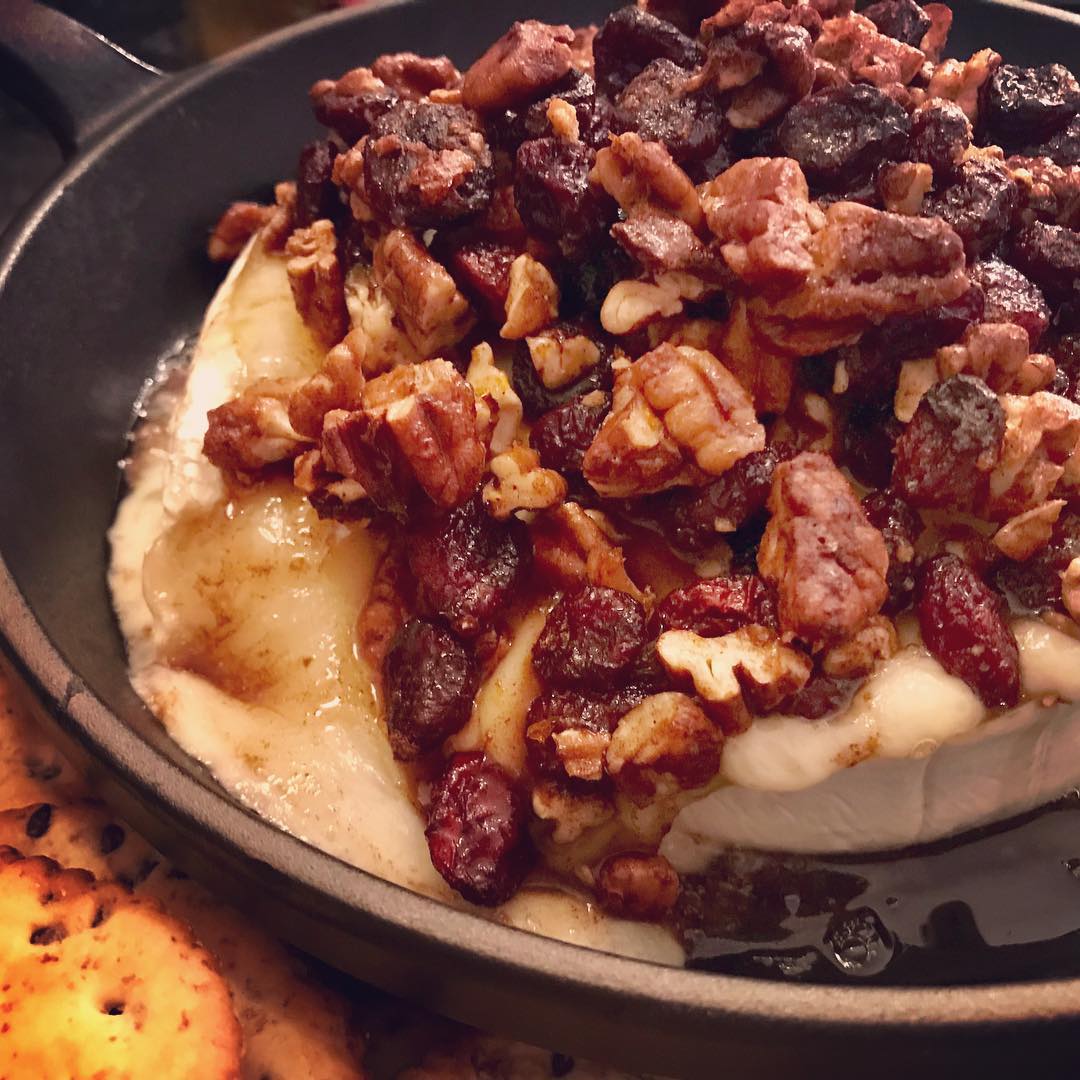 Every year around the holidays, my friends and family request this appetizer for every gathering. It's warm, gooey, sweet, savory and the perfect accompaniment to a festive cocktail or glass of wine. I'm always happy to oblige my guests by serving this upon their arrival, mostly because it's crazy, stupid, easy to pull together and looks incredibly sophisticated! Don't skip this during your next holiday party! You and your guests will be so very happy!
Preheat your oven to 325 degrees Cut the top rind of the brie off. Place the brie, cut side up in a small oven proof baking dish large enough to fit the whole wheel with some room around the sides. In a medium bowl mix together the cranberries, pecans, honey, orange zest and cinnamon. Pour the cranberry mixture on top of the brie and bake for 10-15 minutes until the cheese warms through and begins to melt. The topping will become fragrant but keep a close eye, you don't want to char it. Serve immediately with some good quality crackers. I like to use a stone ground wheat crackers. 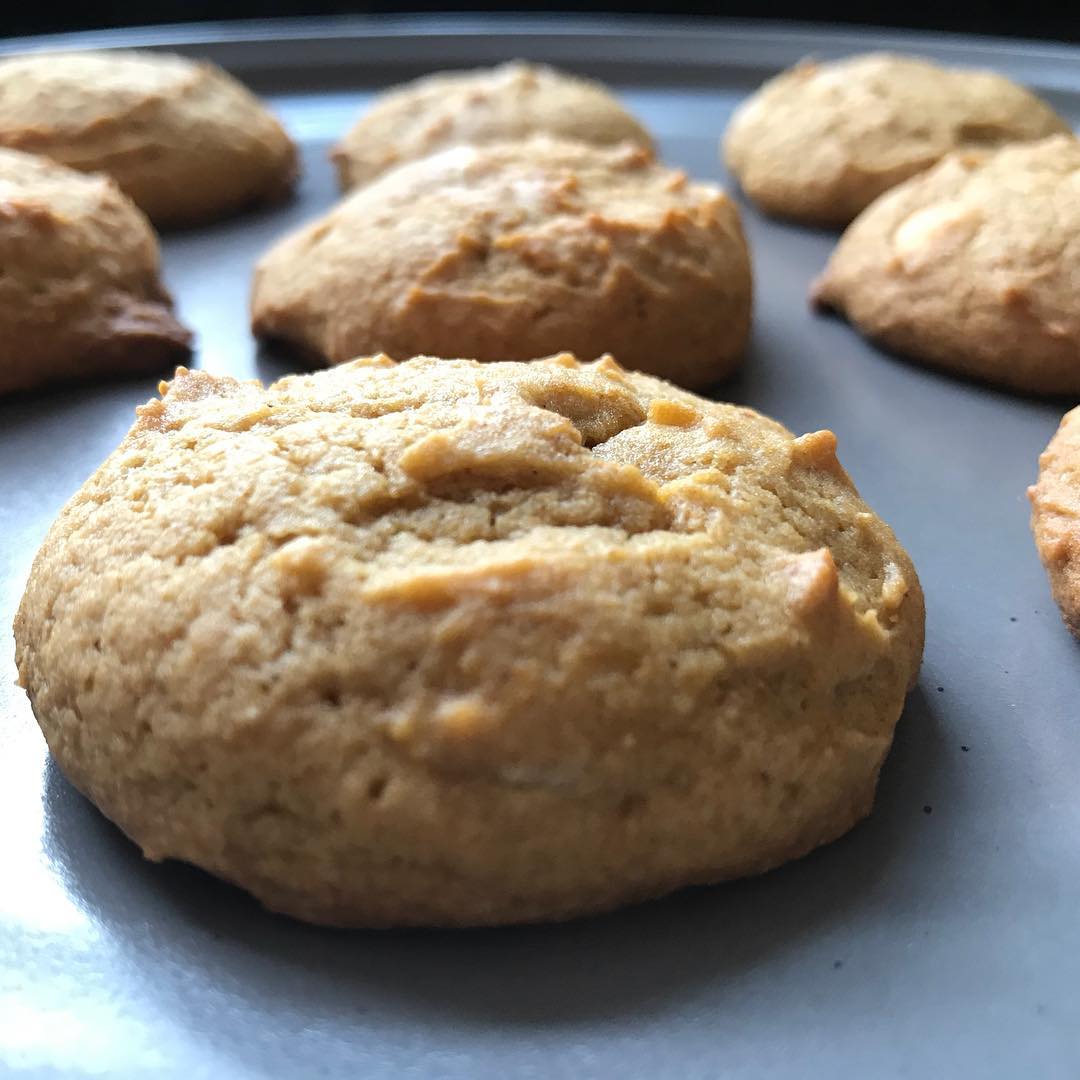 I originally discovered these tasty cookies from my aunt who makes them every year in the fall. She very kindly passed along her recipe to me and I've made a few slight adjustments to create a delicious cake like cookie. You will quickly discover that these are highly addictive! You can never eat just one! Enjoy! Makes 2 Dozen Cookies 1 Cup Butter at room temperature 1/2 Cup Sugar 1/2 Cup Brown Sugar 1 Large Egg 1 Cup Pumpkin Puree 1 tsp Vanilla Extract 3 Cups Flour 2 tsp Baking Soda 1 1/2 tsp Cinnamon 1 tsp Kosher Salt 1/4 tsp Nutmeg 1 bag of Premium White Chocolate Chips Preheat your over to 350 degrees Using a standing mixer, beat together the butter and sugar on medium speed until light and fluffy, about 3 minutes. Scrap down the sides of the bowl and add the egg, pumpkin and vanilla. Continue to mix on medium-low speed until well combined, scrapping down the sides of the bowl as needed, about 2 more minutes. The mixture will appear a bit curdled, that's OK, it will come together when you add the dry ingredients. In a separate mixing bowl, whisk together the flour, baking soda, cinnamon, salt and nutmeg. Add the dry ingredients to the wet ingredients with the mixer running on low, 1/3 at a time, until just combined. Be careful to not over mix the dough. Add the chips and give the dough one last mix. Using a cookie scoop, scoop the dough onto parchment lined baking sheets, about two inches between each cookie and bake for 15-20 minutes, they should be slightly browned on top. Cool on a wire rack and store in an air tight container for up to 5 days. 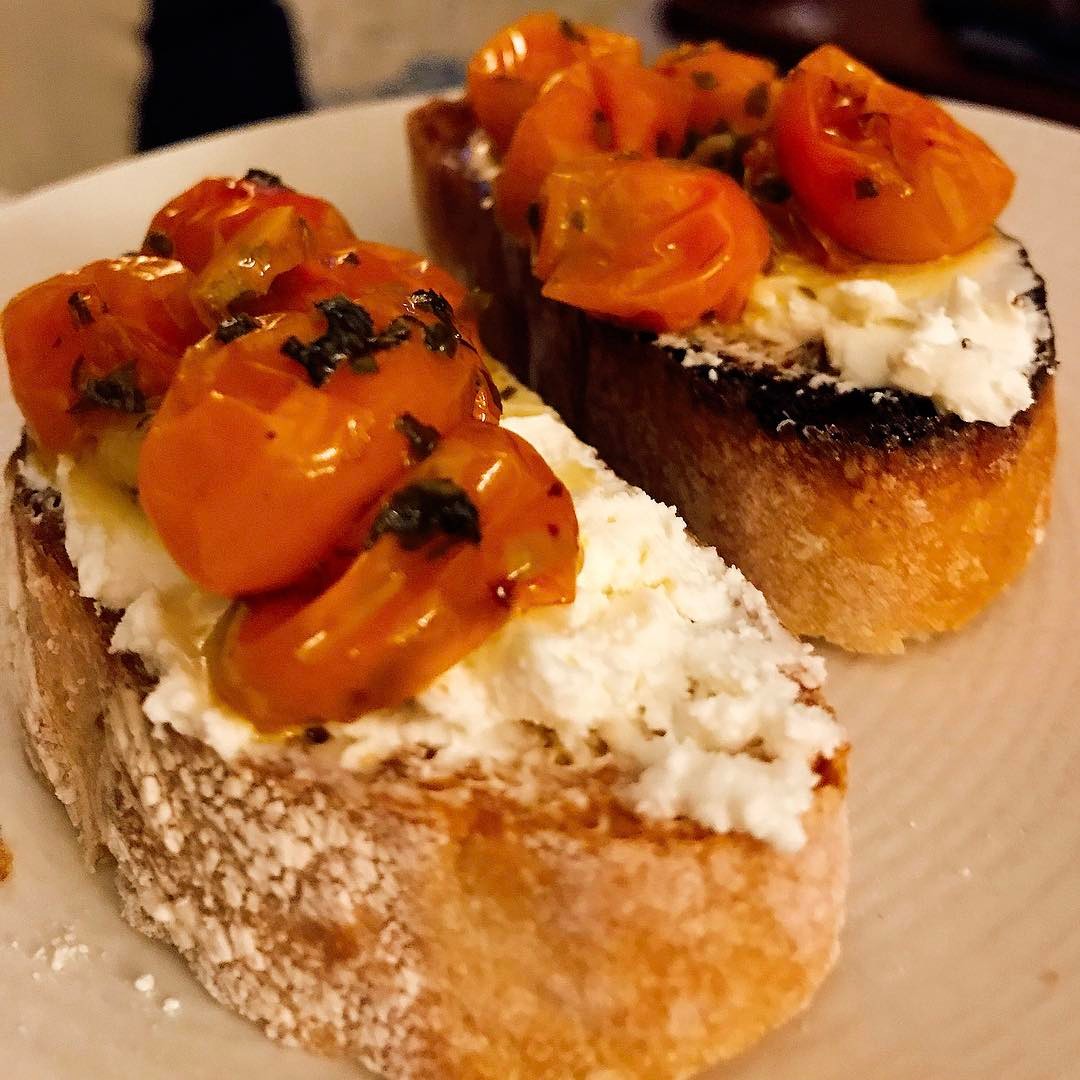 I look forward to my summer tomatoes every year, especially the beautiful yellow sun sweets which always grow in abundance. I sometimes find myself with various bowls of these little sugary tomatoes all over my kitchen and I'm constantly trying to find creative ways to use them up. Although this is probably best categorized as an appetizer, I love to have this for a quick light dinner with a chilled glass of crisp white wine. Its quick to pull together and not too heavy during those hot summer nights. Feel free to use whatever tomatoes you have on hand. The slow roast helps bring out the sweetness in just about every variety. Serves 4 as an appetizer and 2 as a dinner For the Tomatoes 1 1/2 lbs Cherry Tomatoes 3 T Olive Oil 2 Garlic Cloves thinly Sliced 1 tsp Salt Fresh ground black pepper A generous handful of fresh herbs ( Use a mix of whatever you like. I like to use oregano, rosemary, thyme, sage and basil) Use as many or as few as you like For the Whipped Goat Cheese 4 oz. Goat Cheese at room temp 4 oz. Cream Cheese at room temp For the Bread 1 Baguette cut into 1 inch thick slices 3T Olive oil 1/2 tsp garlic salt and fresh ground pepper Preheat the oven to 320 degrees. In a baking dish, toss together the tomatoes, olive oil, garlic, salt, pepper and herbs until the tomatoes are well coated. Roast in the oven for 45 minutes. While the tomatoes are cooking, add the goat cheese and cream cheese to a mixing bowl. Using a rubber spatula or a mixing spoon, cream the cheese together until they become well combined and spreadable. To prepare the baguette, preheat the grill the medium high or if you don't want to use the grill just set your broiler to high. Mix the oil, garlic salt and pepper together in a small bowl. Using a pastry brush, brush the oil onto the baguette slices. Grill the bread until it start to turn golden brown and char in some places. If using a broiler, set it under the flame and watch it closely until the bread starts to char a bit. To serve, spread the cheese onto the warmed bread slices and top with the tomatoes, spooning over some of the juice. Enjoy! *Variation - sometimes I like to add toasted pine nuts to the crostini for an added layer of flavor and texture. Give it a try if you have some on hand. 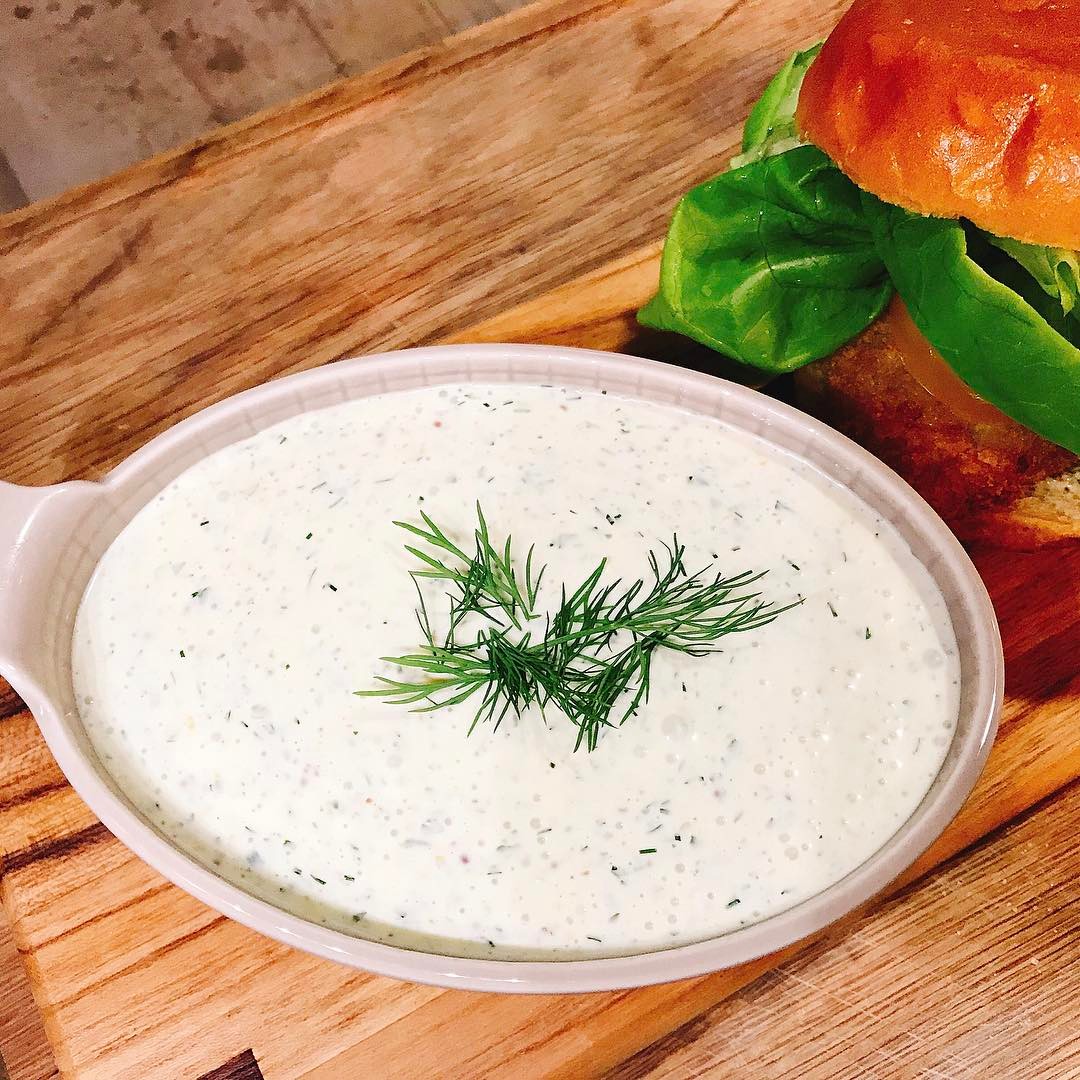 This delightful sauce is incredibly versatile for just about any type of seafood! Its tangy, salty and slightly sweet. Kind of, sort of a tarter but with much more oomph! Serve it up alongside some peel and eat shrimp, drizzle it over grilled fish, or one of my favorite ways to use it, spread generously as a condiment for a fish sandwich! It’s perfect for summertime! You'll be scooping spoonfuls of this stuff onto your plate. Serves 4 generously 1/2 cup Mayo 1/2 cup Sour Cream Juice from 1 lemon 1 T Dijon Mustard 1 T Whole Grain Mustard 1 T Capers, drained 4 Bread and Butter Pickle Slices 2 Large Scallions, white and light green parts chopped in large pieces 2 tsp Agave A handful of fresh dill A handful or Fresh Cilantro Fresh Ground Pepper to taste Add all the ingredients to a food processor and pulse until everything is well combined and the herbs and scallions are chopped finely. Taste for seasoning. I generally never feel it needs salt due to the pickles and capers, but if you think it needs some then add a little pinch. You can also tinker with the tang, if it's too sour for your taste, add a bit more mayo. Transfer to a serving bowl and chill until ready to use. You can also make this a day in advance, I find that it can be even better the next day! 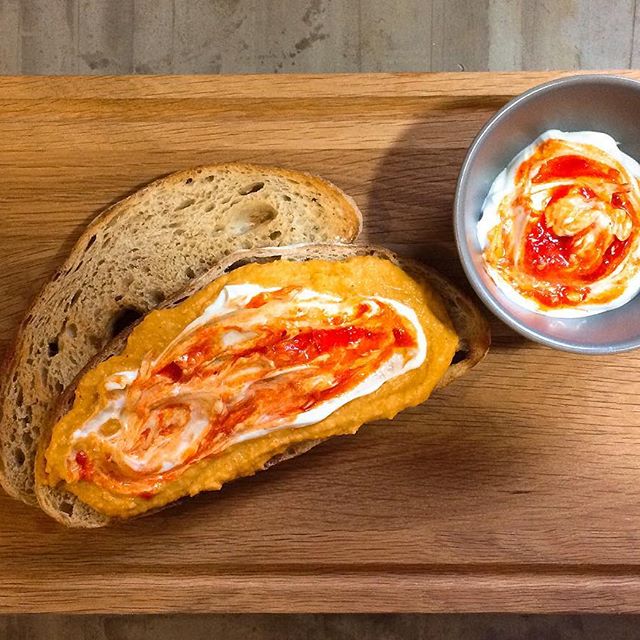 Hummus is probably one of my favorite snack foods to make. I can indulge without feeling too guilty and this version in particular makes me feel like I'm doing something good for myself since it showcases some healthy and super tasty baby carrots!
For the roasted carrots 1 lb. bag of baby carrots 2 T Olive Oil 2 tsp Cumin 1 tsp Coriander 1 tsp Garlic Salt 1/2 tsp Ground Ginger 1/2 tsp Salt Fresh Ground Pepper to taste Preheat oven to 400 degrees. Mix all ingredients in a medium bowl and dump onto a rimmed baking sheet. Cook for 30 minutes, flipping the carrots once half way through the cook time. For the Hummus Roasted carrots 1 can of chickpeas drained but not rinsed 1/4 cup of freshly squeezed lemon juice (about 1 large lemon) 1/4 cup Tahini 3 T Sunflower oil 1 T Shoyu Add all ingredients to a food processor and pulse until it starts to form a paste then turn it on high until it comes together to form a smooth paste. You can add more oil if it seems to thick. Serve on toasted Sourdough and top with greek yogurt and harrisa.....or you can serve it up with a side of veggies and pita, it's up to you! |